Pythonで、GUIアプリを作るには、Tkinterというライブラリを使う方法があります。
Tkinterでは、ウィジェットというGUI部品を、ウィンドウに配置することで、GUIアプリを作っていきます。
ウィジェットを配置する方法は、pack、grid、placeという3つの方法があります。
今回は、placeという方法を紹介します。
「place」の使い方
「place」の使い方は、以下のページで紹介しています。

サンプルコード
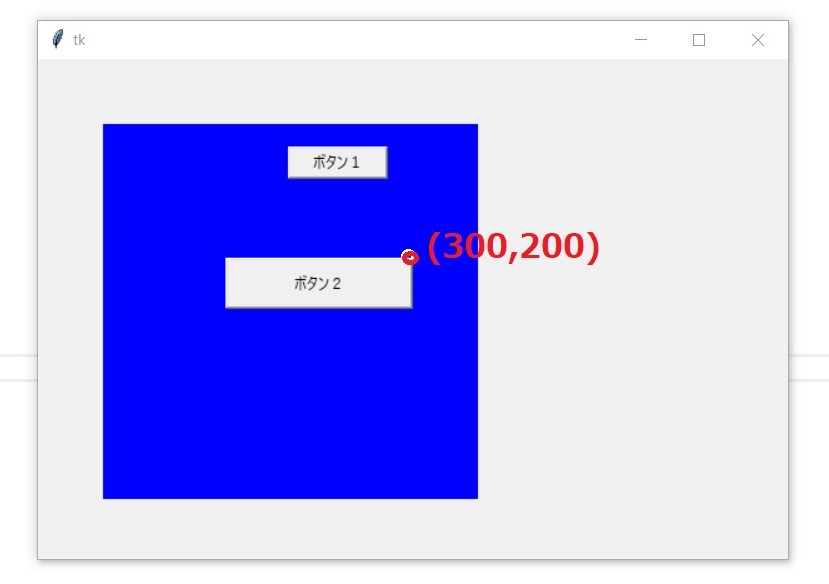
x、yの使い方
#!usr/bin/env python
# -*- coding: utf-8 -*-

from tkinter import *
from tkinter import ttk

# メインウィンドウ作成
app = Tk()
app.geometry("600x400")

# 青色のキャンバス作成
canvas1 = Canvas(
    app,
    width=300,
    height=300,
    bg="blue"
)

# 1つ目のボタン作成
button1 = Button(
    app,
    width=10,
    height=1,
    text="ボタン1"
)

# 2つ目のボタン作成
button2 = Button(
    app,
    width=20,
    height=2,
    text="ボタン2"
)

# ウィジェットの配置
canvas1.place(
    x=50,
    y=50
)

button1.place(
    x=200,
    y=70
)

button2.place(
    x=300,
    y=200
)

# メインループ
app.mainloop()
実行結果

anchorの使い方
#!usr/bin/env python
# -*- coding: utf-8 -*-

from tkinter import *
from tkinter import ttk

# メインウィンドウ作成
app = Tk()
app.geometry("600x400")

# 青色のキャンバス作成
canvas1 = Canvas(
    app,
    width=300,
    height=300,
    bg="blue"
)

# 1つ目のボタン作成
button1 = Button(
    app,
    width=10,
    height=1,
    text="ボタン1"
)

# 2つ目のボタン作成
button2 = Button(
    app,
    width=20,
    height=2,
    text="ボタン2"
)

# ウィジェットの配置
canvas1.place(
    x=50,
    y=50
)

button1.place(
    x=200,
    y=70
)

button2.place(
    x=300,
    y=200,
    anchor=NE
)

# メインループ
app.mainloop()
実行結果
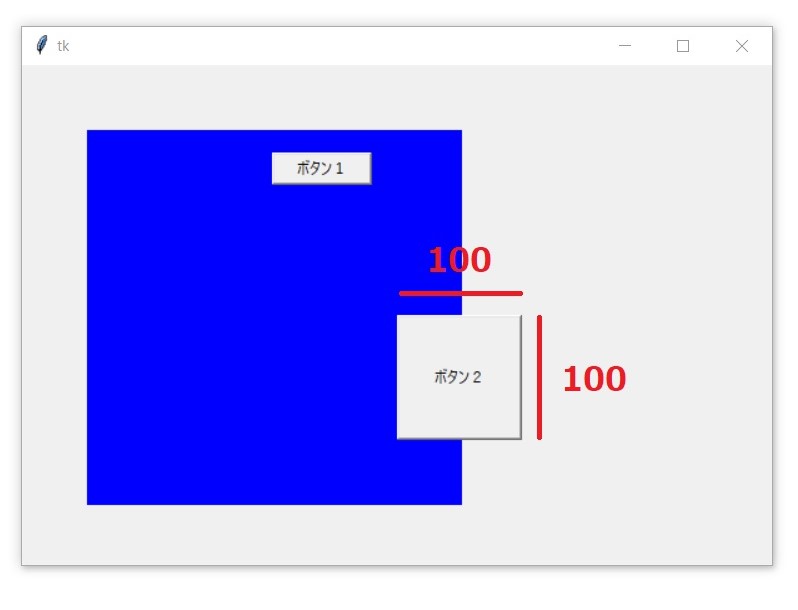
width、heightの使い方
#!usr/bin/env python
# -*- coding: utf-8 -*-

from tkinter import *
from tkinter import ttk

# メインウィンドウ作成
app = Tk()
app.geometry("600x400")

# 青色のキャンバス作成
canvas1 = Canvas(
    app,
    width=300,
    height=300,
    bg="blue"
)

# 1つ目のボタン作成
button1 = Button(
    app,
    width=10,
    height=1,
    text="ボタン1"
)

# 2つ目のボタン作成
button2 = Button(
    app,
    width=20,
    height=2,
    text="ボタン2"
)

# ウィジェットの配置
canvas1.place(
    x=50,
    y=50
)

button1.place(
    x=200,
    y=70
)

button2.place(
    x=300,
    y=200,
    width=100,
    height=100
)

# メインループ
app.mainloop()
実行結果
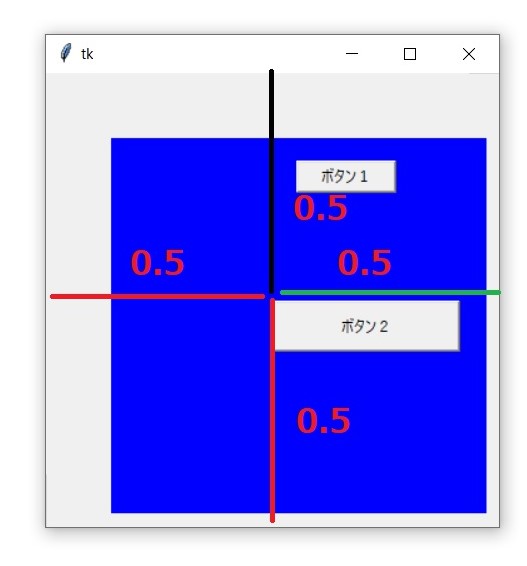
relx、relyの使い方
#!usr/bin/env python
# -*- coding: utf-8 -*-

from tkinter import *
from tkinter import ttk

# メインウィンドウ作成
app = Tk()
app.geometry("600x400")

# 青色のキャンバス作成
canvas1 = Canvas(
    app,
    width=300,
    height=300,
    bg="blue"
)

# 1つ目のボタン作成
button1 = Button(
    app,
    width=10,
    height=1,
    text="ボタン1"
)

# 2つ目のボタン作成
button2 = Button(
    app,
    width=20,
    height=2,
    text="ボタン2"
)

# ウィジェットの配置
canvas1.place(
    x=50,
    y=50
)

button1.place(
    x=200,
    y=70
)

button2.place(
    relx=0.5,
    rely=0.5
)

# メインループ
app.mainloop()
実行結果

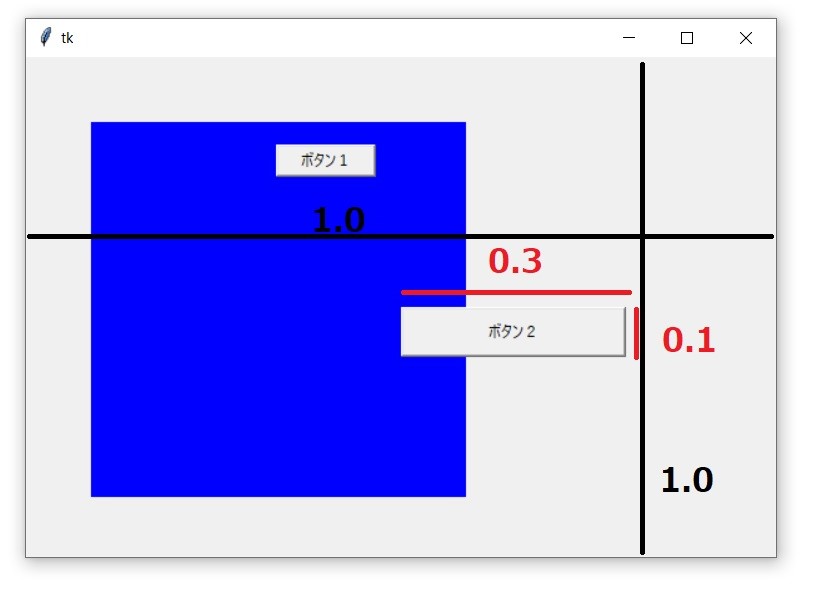
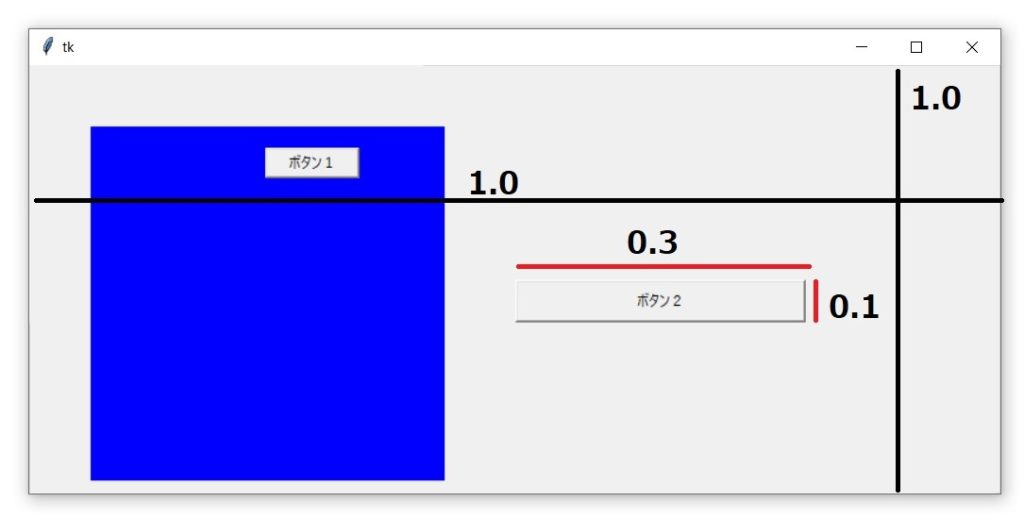
relwidth、relheightの使い方
#!usr/bin/env python
# -*- coding: utf-8 -*-

from tkinter import *
from tkinter import ttk

# メインウィンドウ作成
app = Tk()
app.geometry("600x400")

# 青色のキャンバス作成
canvas1 = Canvas(
    app,
    width=300,
    height=300,
    bg="blue"
)

# 1つ目のボタン作成
button1 = Button(
    app,
    width=10,
    height=1,
    text="ボタン1"
)

# 2つ目のボタン作成
button2 = Button(
    app,
    width=20,
    height=2,
    text="ボタン2"
)

# ウィジェットの配置
canvas1.place(
    x=50,
    y=50
)

button1.place(
    x=200,
    y=70
)

button2.place(
    relwidth=0.3,
    relheight=0.1,
    relx=0.5,
    rely=0.5
)

# メインループ
app.mainloop()
実行結果
まとめ
Tkinterで、ウィジェットを配置する方法として、placeを紹介しました。
リンク

コメント