
Pythonで、GUIアプリを作るには、Tkinterというライブラリを使う方法があります。
Tkinterでは、ウィジェットというGUI部品を、ウィンドウに配置することで、GUIアプリを作っていきます。
ウィジェットを配置する方法は、pack、grid、placeという3つの方法があります。
今回は、gridという方法を紹介します。
「grid」の使い方
「grid」の使い方は、以下のページで紹介しています。

サンプルコード
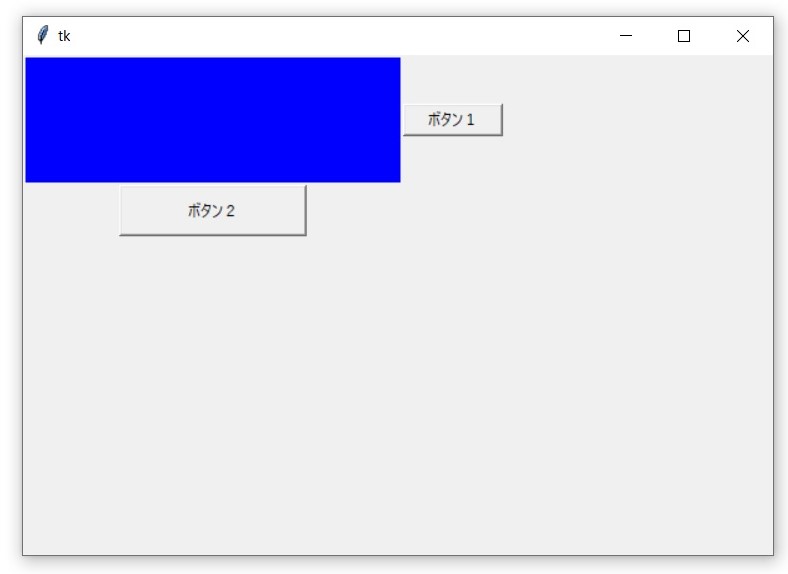
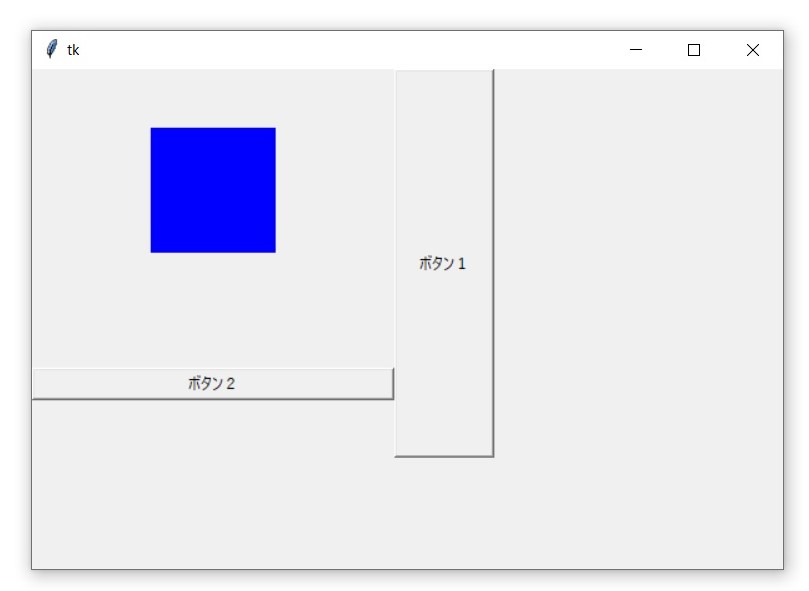
column、rowの使い方
#!usr/bin/env python
# -*- coding: utf-8 -*-

from tkinter import *
from tkinter import ttk

# メインウィンドウ作成
app = Tk()
app.geometry("600x400")

# 青色のキャンバス作成
canvas1 = Canvas(
    app,
    width=300,
    height=100,
    bg="blue"
)

# 1つ目のボタン作成
button1 = Button(
    app,
    width=10,
    height=1,
    text="ボタン1"
)

# 2つ目のボタン作成
button2 = Button(
    app,
    width=20,
    height=2,
    text="ボタン2"
)

# ウィジェットの配置
canvas1.grid(
    column=0,
    row=0
)

button1.grid(
    column=1,
    row=0
)

button2.grid(
    column=0,
    row=1
)

# メインループ
app.mainloop()
実行結果
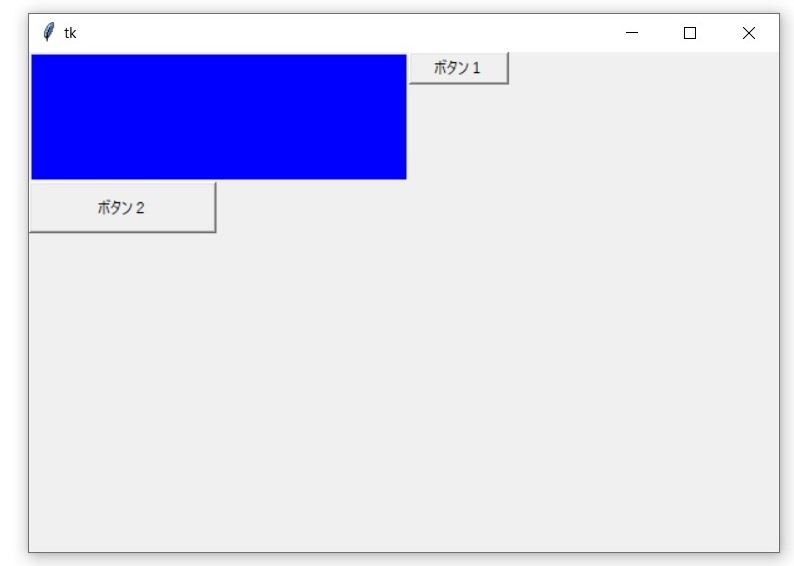
stickyの使い方
#!usr/bin/env python
# -*- coding: utf-8 -*-

from tkinter import *
from tkinter import ttk

# メインウィンドウ作成
app = Tk()
app.geometry("600x400")

# 青色のキャンバス作成
canvas1 = Canvas(
    app,
    width=300,
    height=100,
    bg="blue"
)

# 1つ目のボタン作成
button1 = Button(
    app,
    width=10,
    height=1,
    text="ボタン1"
)

# 2つ目のボタン作成
button2 = Button(
    app,
    width=20,
    height=2,
    text="ボタン2"
)

# ウィジェットの配置
canvas1.grid(
    column=0,
    row=0
)

button1.grid(
    column=1,
    row=0,
    sticky=NE
)

button2.grid(
    column=0,
    row=1,
    sticky=NW
)

# メインループ
app.mainloop()
実行結果
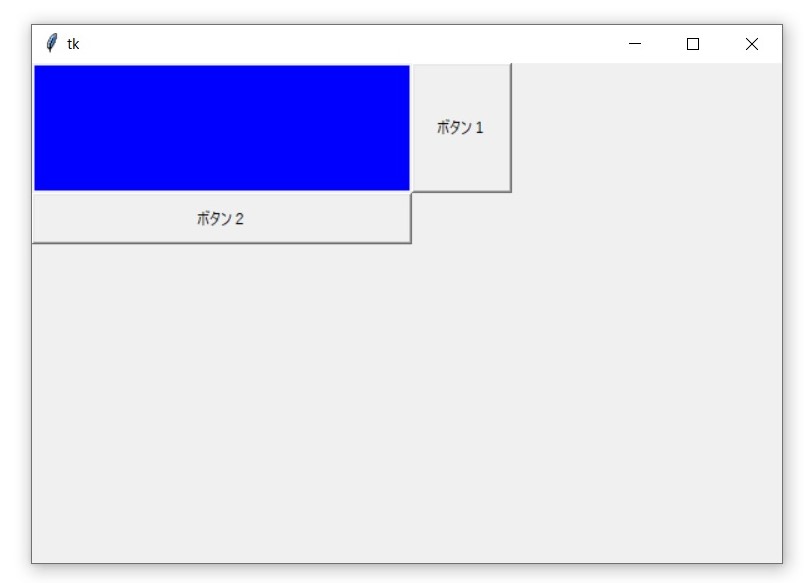
stickyの使い方( ”+” でウィジェットを引き延ばす )
#!usr/bin/env python
# -*- coding: utf-8 -*-

from tkinter import *
from tkinter import ttk

# メインウィンドウ作成
app = Tk()
app.geometry("600x400")

# 青色のキャンバス作成
canvas1 = Canvas(
    app,
    width=300,
    height=100,
    bg="blue"
)

# 1つ目のボタン作成
button1 = Button(
    app,
    width=10,
    height=1,
    text="ボタン1"
)

# 2つ目のボタン作成
button2 = Button(
    app,
    width=20,
    height=2,
    text="ボタン2"
)

# ウィジェットの配置
canvas1.grid(
    column=0,
    row=0
)

button1.grid(
    column=1,
    row=0,
    sticky=NE+SE
)

button2.grid(
    column=0,
    row=1,
    sticky=NW+NE
)

# メインループ
app.mainloop()
実行結果
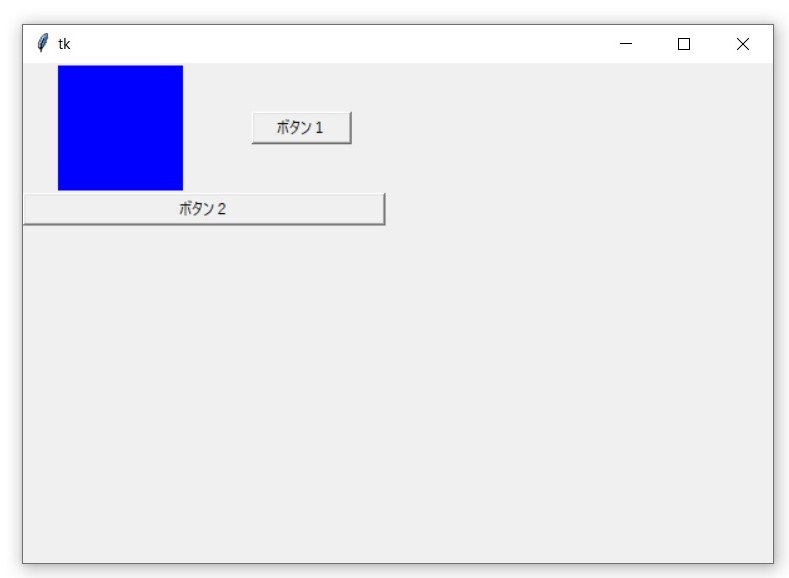
columnspanの使い方
#!usr/bin/env python
# -*- coding: utf-8 -*-

from tkinter import *
from tkinter import ttk

# メインウィンドウ作成
app = Tk()
app.geometry("600x400")

# 青色のキャンバス作成
canvas1 = Canvas(
    app,
    width=100,
    height=100,
    bg="blue"
)

# 1つ目のボタン作成
button1 = Button(
    app,
    width=10,
    height=1,
    text="ボタン1"
)

# 2つ目のボタン作成
button2 = Button(
    app,
    width=40,
    height=1,
    text="ボタン2"
)

# ウィジェットの配置
canvas1.grid(
    column=0,
    row=0
)

button1.grid(
    column=1,
    row=0
)

button2.grid(
    column=0,
    columnspan=2,
    row=1
)

# メインループ
app.mainloop()
実行結果
rowspanの使い方
#!usr/bin/env python
# -*- coding: utf-8 -*-

from tkinter import *
from tkinter import ttk

# メインウィンドウ作成
app = Tk()
app.geometry("600x400")

# 青色のキャンバス作成
canvas1 = Canvas(
    app,
    width=100,
    height=100,
    bg="blue"
)

# 1つ目のボタン作成
button1 = Button(
    app,
    width=10,
    height=20,
    text="ボタン1"
)

# 2つ目のボタン作成
button2 = Button(
    app,
    width=40,
    height=1,
    text="ボタン2"
)

# ウィジェットの配置
canvas1.grid(
    column=0,
    row=0
)

button1.grid(
    column=1,
    rowspan=2,
    row=0
)

button2.grid(
    column=0,
    row=1
)

# メインループ
app.mainloop()
実行結果
まとめ
Tkinterで、ウィジェットを配置する方法として、gridを紹介しました。
Pythonでプログラムを作るのなら、ラズパイが安くて、環境構築も楽で、おすすめです。
Raspberry Pi は、Raspberry Pi Foundationによって開発された低価格で小型のシングルボードコンピュータです。最初は教育目的で2012年にリリースされましたが、その手頃な価格と高性能により、教育用にとどまらず、さまざまなプロジェクトやプロトタイピングのプラットフォームとして広く利用されています。Raspberry Piは、LinuxベースのOSを主に使用し、簡単にカスタマイズ可能であるため、プログラミングやエレクトロニクスの教育、IoTデバイス、ホームオートメーション、メディアセンターなどに活用されています。
デイトラは総受講者数30,000人超の、Webスキルを学べる国内最大規模のオンラインスクールです。
動画コンテンツを見ながら自習を行い、わからないところをチャットツールで質問を行うという形式で学習を行います。そのため、時間・場所を選ばず自分のペースで学習できます。
デイトラ最大の特徴はフリーランスや副業を意識したコースを中心としていることです。Web系フリーランスに必要なスキルを学べるコースを備えており、実際に多数の受講生がフリーランスとなっています。
<オススメポイント>
1. フリーランス/副業を意識したカリキュラム
デイトラは運営陣が全員元フリーランスで、フリーランス向けメディア「東京フリーランス」の運営も行っています。そのためフリーランスに求められるスキル感や現在の流行、そして案件獲得の方法にまで精通しており、カリキュラムにもそのノウハウを反映しています。
「何かを作れるようになる」といった漠然としたゴールではなく、「実際に仕事を受けられるレベルに達する」ことをゴールとしているため、カリキュラムは非常にハイレベルです。
■提供中のコース一覧
・Web制作コース
・Webアプリ開発コース
・Webデザインコース
・Shopifyコース
・動画制作コース
・Pythonコース
・Webマーケティングコース
・AIライティングコース
・Javaコース
2. 受講生による好意的な口コミ
デイトラはTwitter・ブログともに受講生による好意的な口コミが非常に多いです。
カリキュラムやウェビナーなどのサービスの質に満足する声や、実際に案件を獲得できた・転職に成功したなどの成果報告が多数見られます。実際に受講した方の満足する声が多いからこそ、それを見た人が安心して受講に踏み切られています。
デイトラが一年間で8000人以上から受講してもらえたのも、口コミで人が人を呼ぶ構造になっているのが最大の要因です。
3. 圧倒的なコストパフォーマンス
デイトラは一年間のサポート付きで99,800円と格安でサービスを提供しています(例:Web制作コース)。一般的なプログラミングスクールが数十万円の受講料でサポート期間も三ヵ月ほどであることが多いため、それらに比べて非常に安価な価格設定となっています。
さらに、卒業後はカリキュラムの閲覧が不可になるスクールも多い中、デイトラは一度受講したらその後もカリキュラムを見放題です。カリキュラムは随時アップデートされるため、「常に最新の情報を提供してくれる教材」として活用される方も多いです。
デイトラは完全オンラインで教室を持たないスクールで、受講生の口コミによる集客が中心となっています。そのため固定費・広告費を抑え、格安でサービス提供を行えています。
デイトラ
コメント